手动安装服务
2024/10/28大约 6 分钟
手动安装服务
1. mysql安装
- 安装方式: yum/rpm/压缩包解压安装/docker
- http://c.biancheng.net/mysql/20/
由于centOS7中默认安装了MariaDB,需要先进行卸载
# 由于centOS7中默认安装了MariaDB,需要先进行卸载
rpm -qa | grep -i mariadb
rpm -e --nodeps mariadb-libs-5.5.64-1.el7.x86_64
rpm -e --nodeps xxxxx
# 经实践在使用yum方式安装MySQL时不用卸载也可以,会被自动替代通过rpm方式安装需要卸载,否则会出现依赖问题
下载mysql(5.7)的yum安装源文件
wget 'https://dev.mysql.com/get/mysql57-community-release-el7-11.noarch.rpm'安装mysql的yum源文件
rpm -Uvh mysql57-community-release-el7-11.noarch.rpm安装MySQL
yum -y install mysql-community-server启动MySQL服务
systemctl start mysqld公钥没有尚未安装问题
失败的软件包是:mysql-community-common-5.7.38-1.el7.x86_64
GPG  密钥配置为:file:///etc/pki/rpm-gpg/RPM-GPG-KEY-mysql

# 解决方式:
rpm --import https://repo.mysql.com/RPM-GPG-KEY-mysql-2022
yum -y install mysql-community-server
添加MySQL服务到开机启动
systemctl enable mysqld修改mysql默认密码
1. 查看源码安装的MySQL的密码
grep 'temporary password' /var/log/mysqld.log
2. 在Linux下登录mysql服务器
mysql -uroot -p 上一步的临时密码
3. 设置mysql数据密码策略
set global validate_password_policy=0;
set global validate_password_length=1;
4. 修改数据库密码
set password for root@localhost = password('123456');
MySQL数据库创建用户root@%,授权允许远程登录
# 一、在Linux上以root账号登录主机
# 二、在主机上登录MySQL
mysql -uroot -p123456
# 三、先删除原来的 root@% 用户(若之前没有创建,则跳过此步骤)
drop user 'root'@'%';
# 四、删除成功了,再创建用户 root@%
create user 'root'@'%' identified with mysql_native_password by '123456';
# 五、授权
grant all on *.* to 'root'@'%' with grant option;
# 六、刷新配置
flush privileges;
# 七、退出
exit;

# 关闭授权(拓展)
revoke all on *.* from dba@localhost;
mysql验证
# 添加开放端口或关闭防火墙都可以
# 开放指定端口
1. 添加mysql端口3306
	firewall-cmd --zone=public --add-port=3306/tcp --permanent
2. 然后再重新载入
	firewall-cmd --reload

# 关闭防火墙
关闭防火墙:
	systemctl stop firewalld
查看防火墙状态:
	systemctl status firewalld
禁止firewall开机启动:
	systemctl disable firewalld
通过mysql客户端工具进行链接
- Navicat
- sqlyog
- ……
2. nginx 安装
添加nginx的源地址
rpm -Uvh http://nginx.org/packages/centos/7/noarch/RPMS/nginx-release-centos-7-0.el7.ngx.noarch.rpm安装nginx服务
yum -y install nginx查看nginx启动状态
systemctl status nginx启动nginx
systemctl start nginx添加nginx服务到开机启动
systemctl enable nginxnginx验证
- 在浏览器地址栏中输入对应的ip, 显示以下图片信息即OK

3. php安裝
添加PHP的源地址
rpm -Uvh https://dl.fedoraproject.org/pub/epel/epel-release-latest-7.noarch.rpm
rpm -Uvh https://mirror.webtatic.com/yum/el7/webtatic-release.rpm
安装PHP的基本组件
yum -y install php70w.x86_64 php70w-cli.x86_64 php70w-common.x86_64 php70wldap.x86_64 php70w-mbstring.x86_64 php70w-mcrypt.x86_64 php70w-mysql.x86_64 php70w-pdo.x86_64 php70w-gd.x86_64 php70w-mysqli错误汇总:
错误1:

解决方案:
yum -y install mysql-community-libs-compat
# 上面安装完,需要再重装1次PHP基本组件
yum -y install php70w.x86_64 php70w-cli.x86_64 php70w-common.x86_64 php70wldap.x86_64 php70w-mbstring.x86_64 php70w-mcrypt.x86_64 php70w-mysql.x86_64 php70w-pdo.x86_64 php70w-gd.x86_64 php70w-mysqli
错误2:

解决方案:
yum clean all # 清理本地yum缓存上面安装完,需要再重装1次PHP基本组件
yum -y install php70w.x86_64 php70w-cli.x86_64 php70w-common.x86_64 php70wldap.x86_64 php70w-mbstring.x86_64 php70w-mcrypt.x86_64 php70w-mysql.x86_64 php70w-pdo.x86_64 php70w-gd.x86_64 php70w-mysqli安装PHP-fpm(进程管理器,提供PHP进程管理方式,可以有效控制内存和进程、平滑重载PHP配置)
yum -y install php70w-fpm php70w-opcachephp启动
1. 查看版本以检测是否安装成功
php -v
2. 安装完之后启动php-fpm
systemctl start php-fpm
3. 设置开机启动
systemctl enable php-fpm
4. 加载php-fpm的配置文件
systemctl daemon-reload
验证php与nginx的联动性
1. 修改nginx的配置文件
vi /etc/nginx/conf.d/default.conf
2. 在配置文件的server节点中增加以下内容
location ~ \.php$ {
    root           /usr/share/nginx/html;
    fastcgi_pass   127.0.0.1:9000;
    fastcgi_index  index.php;
    fastcgi_param  SCRIPT_FILENAME $document_root$fastcgi_script_name;
    include    fastcgi_params;
}
3. 重启nginx服务器
nginx -s reload
4. 在项目默认路径下创建测试引导文件index.php
echo "\<?php phpinfo(); ?>" >/usr/share/nginx/html/index.php
5. 在当前电脑的浏览器当中输入:
虚拟机的IP/index.php  显示php信息
4. TPShop部署
1. 商城TPShop项目源码
1. 上传Tpshop的源码包【TPshop_20190115.zip】到特定目录 /usr/share/nginx/html
先拷贝到用户目录
再移动到特定目录  /usr/share/nginx/html
mv TPshop_20190115.zip /usr/share/nginx/html
2. 目录切换到   /usr/share/nginx/html
cd /usr/share/nginx/html
3. 解压缩文件到当前路径
unzip TPshop_20190115.zip
4. 修改html目录下所有文件权限
chmod -Rf 777 *
2.修改nginx配置文件
1. 将default.conf文件替换掉nginx原有配置文件的内容,原有配置文件为 /etc/nginx/conf.d/default.conf
2. 将default.conf上传到用户目录
3. 再将default.conf移动到/etc/nginx/conf.d/
mv default.conf /etc/nginx/conf.d/
nginx配置文件(注意端口):
server {
    listen       80;
    server_name  0.0.0.0;

    location / {
        index  index.html index.htm index.php;
        if (!-e $request_filename){
            # index.php/
            rewrite ^(.*)$ /index.php?s=$1 last;
        }
    }

    location  /public/ {
       alias /usr/share/nginx/html/public/;
    }

    # 安装时的资源
    location  /install/ {
       alias /usr/share/nginx/html/install/;
    }

    location /template/ {
       alias /usr/share/nginx/html/template/;
    }

    location ~ /.*\.php/ {
    rewrite ^(.*?/?)(.*\.php)(.*)$ /$2?s=$3 last;
    }

    error_page   500 502 503 504  /50x.html;
    location = /50x.html {
        root   /usr/share/nginx/html;
    }

    location ~ \.php$ {
        root           /usr/share/nginx/html;
        fastcgi_pass   127.0.0.1:9000; #php-fpm监听端口
        fastcgi_index  index.php;
        fastcgi_param  SCRIPT_FILENAME $document_root$fastcgi_script_name;
        include    fastcgi_params;
    }
}
重启nginx服务
systemctl restart nginx3. 修改linux及mysql的安全配置
# 1.临时关闭SELinux的权限
setenforce 0

# 2.永久关闭SELinux的权限,修改/etc/selinux/config为如下:
vi /etc/selinux/config
#SELINUX=enforcing #注释掉
#SELINUXTYPE=targeted #注释掉
SELINUX=disabled #增加

#同步数据:
sync
#然后重启:
reboot

#2.在/etc/my.cnf的mysqld下增加以下配置项:
sql-mode=NO_AUTO_CREATE_USER,NO_ENGINE_SUBSTITUTION
#3.修改mysql的配置文件之后,重启mysql
systemctl restart mysqld
mysql配置文件:
[client]
default-character-set=utf8

[mysql]
default-character-set=utf8

[mysqld]
init_connect='SET collation_connection=utf8mb4_bin'
init_connect='SET NAMES utf8mb4'
character-set-server=utf8mb4
collation-server=utf8mb4_bin
skip-character-set-client-handshake

# 配置sqlmode语法校验规则
sql-mode=NO_AUTO_CREATE_USER,NO_ENGINE_SUBSTITUTION

# 引擎
default-storage-engine=INNODB
max_allowed_packet=256M
innodb_log_file_size=2GB
optimizer_switch = derived_merge=off
binlog_format=row
log_bin_trust_function_creators = 1

# 跳过域名解析
skip-name-resolve
# 设置东八区
default-time-zone='+08:00'

# 隔离级别
transaction-isolation=READ-COMMITTED
datadir=/var/lib/mysql
socket=/var/lib/mysql/mysql.sock
symbolic-links=0
log-error=/var/log/mysqld.log
pid-file=/var/run/mysqld/mysqld.pid
5. 初始化tpshop项目
在浏览器地址栏中输入 ip/index.php, 会进入到tpshop的安装页面
- 访问:http://192.168.10.31:9100/install/index.php
点击 “接受” 按钮后,会进入到环境检测试页面
正常情况下,环境检测应该是没有问题的,直接点击“下一步”
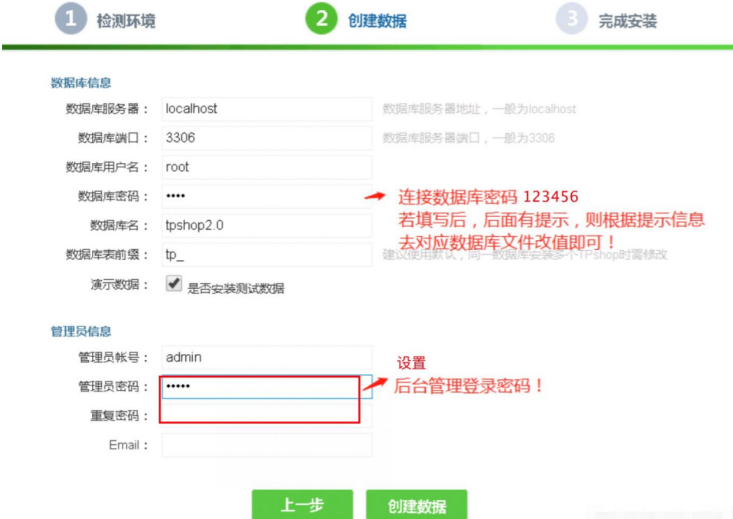
在创建数据页面中,输入对应的信息(如下图),点击创建数据,即可安装

6. 环境的验证
- 安装完成之后,在完成的页面点击 “进入前台”,能够打开tpshop首页,且能打开二级页面,就说明环境搭建成功


7. 访问链接
- 前台:http://192.168.10.31:9000/index.php
- 后台:http://192.168.10.31:9000/index.php/Admin/Admin/login.html
8. 验证码修改
代码路径
xxx/TPShop-v3.0/html/thinkphp/library/think/Verify.php
class Verify {
    protected $config =	array(
    	// 验证码字符集合
        //'codeSet'   =>  '2345678abcdefhijkmnpqrstuvwxyzABCDEFGHJKLMNPQRTUVWXY',             		 'codeSet'   =>  '8888', //改为8888
    )
}
